What is Pad Printing ?
Pad printing (or “Tampography”) is a wet ink transfer process using Silicone based press pads to provide uniform pressure across flat or irregular substrates (material). Pad printing was originally designed to print watch and clock faces. Today it’s almost impossible to not be within arm’s reach of an item that has been printed using a pad printing machine.
How does Pad Printing work ?
Pad printing is an indirect offset printing process. An image is transferred from a plate (cliché), using silicone pad, onto a surface to be printed. Today there are two primary ink laying (doctoring) methods used. The first being the old traditional “open inkwell system” (illustrated below), the second being the newer more widely accepted sealed cup system. For the sake of starting with the basics, we have illustrated the older “traditional” method below.
To accomplish this, an image is chemically etched into a smooth steel or polymer surface (called a cliché or plate). Typically, the etch is very shallow, image depth is usually around .001″ to .0012″ or 24 to 28 microns.
Using an ink cup (or “doctoring blade”) the etched image is coated (flooded) with ink. As the ink cup passes over the image again it removes excess ink from the smooth surface along the plate leaving only the now ink flooded image remaining. The silicone pad (or tampon) then picks up or lifts the ink from the etched image and transfers the image directly onto the surface to be printed.
Today in pad printing, silicone transfer pads are used almost exclusively since silicone is the best-known pick-up and release agent for this printing process.
The graphics and paragraph below might help to better understand the process…
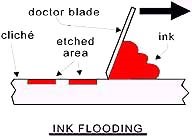
Step 1
The image to be transferred is etched into a printing plate (cliché). Once mounted in the machine, the cliché is flooded with ink. The surface of the cliché is then doctored (wiped) clean, leaving ink only in the image area. Solvents in the ink evaporate and enhances the ink’s ability to adhere to the silicone transfer pad.
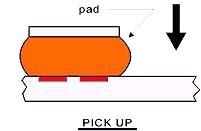
Step 2
The pad is then positioned directly over the image, compressed onto the image. Here, using the adhesive properties of the ink, the image transfers to the silicone pad. (The chemical makeup of the ink allows the image to “stick” to the silicone pad.)
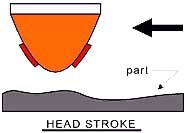
Step 3
After the pad has lifted away from the cliché to its complete vertical height, there is a delay as the pad moves over the part to be printed. During this stage, the ink has just enough time to develop enough additional adhesion to stick to the part (solvents continue to evaporate from the outer ink layer that is exposed to the atmosphere, making it tackier and more viscous.)
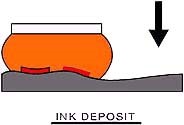
Step 4: Ink Deposit
The pad is pressed down onto the substrate (part), conforming to its shape and depositing the ink in the desired location. Even though it compresses considerably during this step, the contoured pad is designed to roll away from the substrate surface rather than press against it flatly, thus decorating the part with a perfect image.
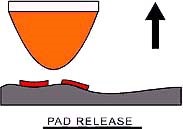
Step 5
The pad lifts away from the substrate and assumes its original shape, leaving all of the ink on the substrate. During this whole cycle the ink undergoes physical changes and when the pad is pressed onto the substrate, the adhesion between the ink and substrate is greater than the adhesion between the ink and pad, resulting in a virtually complete deposit of the ink. This leaves the pad clean and ready for the next print cycle.
When could I use Pad Printing?
There really isn’t much that a pad printer can’t do. Pad printers are used in applications from irregular shaped parts to tagless t-shirts.
Give us a call and we’ll help you figure out what method may be best for your application.
Can I print on textured surfaces ?
Yes. There are plenty of variables when it comes to textured surfaces but the reality is that you can produce great results on even “very rough” textured surfaces once the setup is dialed in. If you ever have problems printing to any surface give us a call, we can help.
Is Pad Printing cost effective ?
Very! The cost per cycle/per part is usually significantly lower than any other process while providing superior results. (There are many studies to support this). It should be noted that, silicone pads provide a very predictable long service life.
Another benefit is that one Pad Printing machine can do several jobs. With some minor (low cost) tool and pad changes you can quickly jump into a new or concurrent production run. Some of our clients have one machine for nearly all of their print jobs.
Why is Pad Printing so effective ?
Using silicone pads gives pressure uniformity and surface conformity in combination with a low tack surface. Using formulated inks allows great control in applying the image to your substrate.
Can you match colors ?
Service Tectonics has an in-house Graphics Lab, the head of which has over 20 years’ experience and is a master at mixing custom inks. In short, Yes, we can match color or mix custom colors.
Can I print on Black or Dark surfaces ?
Yes. We recommend “double hitting” when printing light colors on darker parts.
Can I print multi-color images? (More than one color printed on a part)
Yes.
Are there limitations to pad printing ?
The only limitation may be size. If the printing area exceeds a diameter of about 18” pad printing my not be the best solution. Until recently the size of the machine needed to print anything above 12” was prohibitive. But with newer technological advancements, and the use of 6-12 axis robots the only limitation is ink cup/well and cliché size.
Can Pad Printing machines perform other work/printing ?
Yes. Pad Printing methods can be used in applying other mediums (stickers, laminates, foils and other liquid mediums). Give us a call and we can discuss the possibilities.
How long will pads last ?
A pads life is typically 30,000 to 100,000 cycles, but in reality, as long as you are happy with the image results the pad is still viable and may exceed the projected life cycle.
Where do I get supplies for printing ?
STI carries everything you will need for your pad printer. From quality lines of ink, silicone pads, ink cups, even spare parts for your machine. Whatever you may need to get started and to keep you producing quality prints.
Could I print on very delicate or flexible items?
The pad printing process applies some pressure to the substrate (part) being printed. A “nesting fixture” (support structure) is fabricated to support the part in place during the printing process. Printing on an eggshell or a delicate wine glass, as opposed to a solid golf ball, is more challenging and requires special printing pads and fixture tooling but can be done. Whenever you’re faced with a difficult print call and consult with us.


 Call Us
 Email Us
 Office Hours