


The process of Pad Printing is the most versatile of all printing processes with its unique ability to print on three-dimensional objects and compound angles. The theory behind the pad printing process evolved from the screen, rubber stamp and photogravure printing processes.
This is how the process works:
Step 1: “Etching”
An Image is etched into a steel or polymer plate called a Cliché. This is typically done by hand using photo sensitive chemicals and acid. Although some printers are using lasers for the etching process, we find that the final printed results are not as sharp as the acid method.
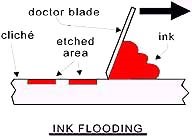
Step 2: Flooding
Once mounted in a Pad Printing Machine, the cliché is “flooded” with ink. The surface of the cliché is then doctored (wiped) clean, leaving ink only in the etched image area.
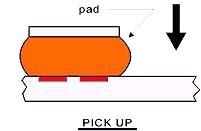
Step 2: Pick Up
A Silicone pad, positioned directly over the etched image on the cliché, is pressed down onto the image and then lifted away. The pad “Picks Up” the image. The physical changes (evaporation) that take place in the ink during “flooding” (and “doctoring”) allow the image to be transferred to the pad.
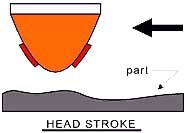
Step 3: Print Stroke
After the pad has lifted away from the cliché, the machine moves the pad directly over the part to be printed. During this time, before the ink is deposited on the substrate (part), the ink develops additional adhesion properties (Becoming tackier and more viscous).
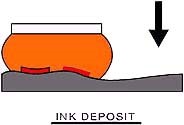
Step 4: Ink Deposit
The pad is pressed down onto the substrate, conforming to its shape and depositing the ink in the desired location. Even though it compresses considerably during this step, the contoured pad is designed to roll away from the substrate surface rather than press against it flatly. A properly designed pad, in fact, will never form a 0-degree contact angle with the substrate; such a situation would trap air between the pad and the part, resulting in an incomplete transfer.
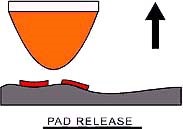
Step 5: Pad Release
The pad lifts away from the substrate and assumes its original shape again, leaving all of the ink on the substrate. As mentioned previously, during the “Print Stroke” the ink develops additional adhesion properties (Becoming tackier and more viscous), so when the pad is pressed onto the substrate, the adhesion between the ink and substrate is greater than the adhesion between the ink and pad, resulting in a virtually complete deposit of the ink. This leaves the pad clean and ready for the next print cycle.
Limitations of Pad Printing
Versatile as it is, the process does have a few limitations. For example:
1. Image transfer is much more reliable and efficient when solvent-based inks are used. The use of water-based or UV curable inks are not recommended and generally produce poor results.
2. The object to be printed needs to have a higher surface energy (greater adhesion) than the pad. Printing on silicone and other non-stick materials typically produces very poor results, as well as wet, greasy parts. Some substrates such as certain types of plastic require pre-treatment.
3. Pad printing is, typically, limited to images of 100 sq inches or less. Large opened areas (greater than 4.0 sq. in) can be difficult to cover but, there are, special etchings and screened cliché’s that help in some instances. We can advise you what method is best in these situations.
4. Pad printing produces a finished ink film thickness of approximately .00025″ to .0003″ with a single pass. While this is often a desired effect, by screen printing standards, this is very thin. If an image with a thicker depth is desired this can often be achieved by multiple “passes” (printing the same image more than once).
 Call Us
 Email Us
 Office Hours